well i am pleased to report that Pezzy appears to have decided she will go ahead and use the potty full time now. i must say she was easier than my middle one – i didn’t think he was going to get to go to kindergarten!!
now on to the show *hee heee* – ya might want to grab a cup of coffee and get comfortable – there is ALOT packed in here!!! but i have a little reward at the end *wink*
the challenge on Just Buggin is to bling up your die cuts – oh samantha were you reading my mind??? i will add bling to ANYTHING if it sits still long enough! the question was NOT how am i going to do this but how am i going to narrow down all of my options….there is always the easy and obvious – cover them in STICKLES! then i came across a reference on one blog that led me to another blog which led me to a youtube tutorial – y’all know how that goes – and next thing i know i was doing some experiments so i thought i would share the results with all of you for those who want to know. first my project – page 1 of a 3 page LO that also incoporates TWO challenges:
Just Buggin: just bling it OCCC – inspiration challenge – pumpkin stack people PageMaps – not so much a challenge as the greatest source on the planet for scrapping & cardmaking sketches!
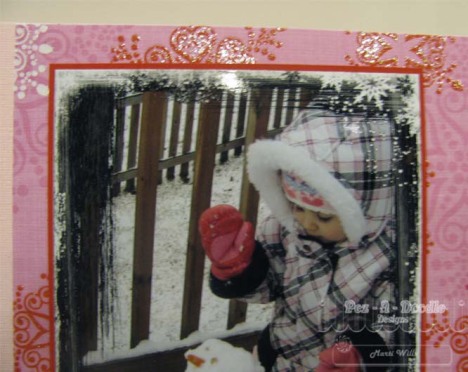
the pics are from last winter – daddy took pez out and taught her how to build a snowman 🙂
i used papers from the peppermint forest stack – i am finally starting to embrace all the odd off beat colors of christmas and thought the whole pink snowflake theme would match pezzy’s pink clothes nicely.
 next i used everyday paperdolls and doodlecharms cricut carts for the little girl, the snowfamily and the snowflakes. i inked the edges of all the pieces for the girl & snowmen. the faces are peachy keen stamps – kathy makes the MOST adorable faces i have ever seen! i used some crystal ice stickles to highlight the snowmen and also gave the faces some color with copics. i added ice stickles to the pattened snowanimal paper too.
 now the snowflakes i have lots of different things going on with them for comparison’s sake so if you want the deets on them just continue reading!

I put a rose red glittered skittle in the center of each snowflake…

the title piece has yet another snowflake and a cute little glittered skittle snowman. i stamped the title with a studio G stamp and brilliance pearlescent poppy ink.

i wanted to call your attention to the large pic – i took a class with jessica sprague and learned loads of fun stuff to do including this frame overlay technique. i plan to do more altering on my photos as i go and highly recommend the classes to anyone interested in getting alot more out of photoshop elements!
now for the fun and messy part!!

you’ll need to start by gathering some supplies All of these can be found on my website except the glitter – let me know if there is something you can’t find):
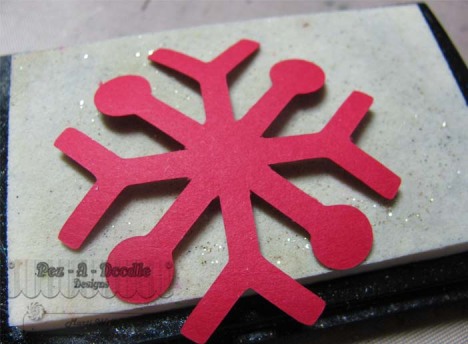
Here you can see the snowflakes. you need primas or die cuts or whatever else you want to glam up (either white or colored), pearl mist (i prefer to make my own from perfect pearls, water & reinker – see my tutorial here), UTEE (Ultra Thick Embossing Powder, fine glitter, small container with lid, versamark/embossing ink pad, heat gun.

Step 1: give your items some color and shimmer. here i sprayed the die cuts with pearl mist made from water and perfect gold perfect pearls. this gives them an all over shimmer. now this alone can be a GREAT place to stop. in fact i sprayed the patterned paper on my LO with it as well so it became shimmer paper 🙂 let these dry completely – at the end you can speed them along with a heat gun. they MUST be completely dry before using UTEE.

now make your glittering UTEE – i did not measure this – just dump a little UTEE in your container and dump in some glitter – shake it & mix it up well.

now just smoosh each one really good into your versamark pad – be sure to get it good and covered. something i noticed about this step – it made them much darker than their original color because they were wet…and the color stayed that way so several of mine ended up being much darker than i wanted them to be. this *might* be why the person in the original video started with primas that were white not colored. i have a second experiment drying downstairs and waiting for the next step. it will be up tomorrow with deets.

After coating them well with versamark you will pour on the UTEE glitter mix. carefully shake them off and place them on a surface where you can use your heat gun (i swear by my craft mat!) you can see here they are very coated. nw heat them until it all melts. this can be the tricky and seriously messy part. i recently switched to the ranger heat gun after my marvy one got water in it (don’t ask). i will be honest it seems not as hot, not as quick and not as easy to aim BUT – and this is a biggie for me – it blows out softer so it does not send the UTEE flying in every direction. IF you have a more forceful type gun be sure to hold it high above the UTEE and start the heating process, as it warms and begins to melt you can slowly move the gun closer.

ok this pic kinda sucks BUT here they are. next step – you need another coat of UTEE – either plain or the glitter one if you want more glitter.
the effect is glitter trapped in glass almost and very sparkly!

here are the flowers from yesterday – i tried three different things – the flower on the left is blue and no pearl spray, the top right is blue and has gold perfect pearls mist on it, the bottom right started out white and i sprayed it with a perfect pearls mist with gold perfect pearls AND a bright blue reinker. they start off looking almost identical in color…
in the bottom pic the flowers are in the same place. you can see how much darker the two larger flowers became from the embossing ink. the one that started out as white sayed truer to color. the pearl shimmer IS somewhat visible once they are covered with UTEE & glitter and i think does add to the effect tho it is not necessary.
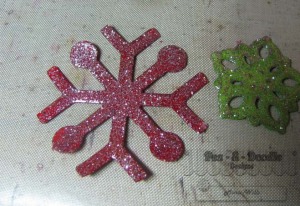
 HOWEVER i wasn’t sure if it was my fave way of just blinging it. so i created several different styles. here they are for you to compare. in addition to the 2 demonstrated above i have 1 large one done by sandwiching a layer of perfect pearls between layers of UTEE, the small green one is just pearl mist and the bottom middle is covered in gold ICE stickles.

here is a close up of the perfect pearls sandwich. the cool thing about this technique is the reaction between the perfect pearls and the UTEE. the top layer of UTEE drips through the layer of perfect pearls as it melts. you can also see the gorgeous thick smooth finish UTEE gives you.

here is the one that is just sprayed with the perfect pearls mist – this is a far subtler look of shimmery-ness.

this is the snowflake covered with gold ice stickles – frankly this one has the biggest bling factor. however all of them are superb and have a unique look to them.
and now i have a surprise for those of you who are still with me – A GIVEAWAY!!! leave me a comment and tell me which method is your favorite. on friday i will draw a random name and that person will receive all of the items needed to make his or her favorite style (minus the cricut cartridge to cut the shapes out of course)!! so if you want to give one of these techniques a try but don’t have all the goodies you need sign up for this giveaway!!
ok i am off to attempt to talk Pezzy into napping…..
thanks so much for stopping by!!!
Filed under: Challenges, Layouts, photo technique, Tutorials | Tagged: cricut, just buggin, Tutorials, UTEE |


I have so much fun adding bling. I have never tried UTEE before. My favorite is with Stickles.
that is absolutely the cutest thing!!!!!!
I had never seen how this was done and your instructions were so easy to follow. Of course, I need all the supplies you mention as I don’t have a single one. I have always stuck to stickles as that is the easiest for me ;). Maybe some day I’ll be brave enough to get into fancier methods of bling!
What a pretty LO! I love the colors! Not what you’d expect for a snowy day LO.
I think I”m most intrigued by the UTEE/glimmer mist sandwich technique – looks sooo cool!
Thanks, Marti!
Oops! I meant UTEE/ Perfect Pearls! LOL!
Adorable LO! Love the snowflakes and the snowmen with their cute little faces.
I love the way you added the glitter to the snowman family–just the right touch of bling. I think my favorite here is the perfect pearls sandwich but I also really like the glittery UTEE.
Oh my, these are beautiful. The perfect pears with the UTEE came out sooo pretty!
[…] number 11 is… Richelle, on November 9th, 2009 at 11:58 PM Said: I really like the perfect pearls one. I like the effect it […]
Oh my. I have to chose which is my favorite! I love them all!! 🙂 I think I love the perfect pearls sandwich the best, but like I said, I really love them all! I love your layout that you did. Pezzy is just adorable! I love seeing your work. It is always awesome!
Sharon